Messaging
Messaging cards allow you to edit and customize the type of message within the Guided Conversation. This can be done by collecting information from the user, creating a form, allowing dropdown options, creating rating scales, adding the date/time, creating simple messages or allowing multiple message paths.
Collect Information
This card enables you to create information to be used as a variable in a later part of the conversation, such as in a ticket, logic, or an API call.
To start, click the plus sign, and select Collect Information card in the drop-down menu, then you can format it as:
- Open-ended text (this is the default format)
- Multiple choice with Quick reply buttons or Dropdown list (advanced option)
Open-Ended Text
- Type your question into the open text box to prompt the user.
- Name your variable in the Save Reply As field.
To add a dropdown list of options or quick reply buttons to your card. To start, click the plus sign, and select Dropdown card in the drop-down menu, then:
- Type your question into the open text box to prompt the user.
- Name your variable in the Save Reply As field.
- Click Advanced Options, and Select Quick Reply Buttons or Dropdown List. (Note: Quick reply buttons work best for 5 or fewer options. A dropdown list is best for more than 5 options.)
- Add your options in the Custom Options section, and click Done.
- You can also add options from a previous App Action card in the conversation by selecting From App.
Validation
- Select Advanced Options, and choose Text or Numeral in the Response Validation dropdown.
- Type the error message you want to appear if the collected info from the user doesn't meet the validation.
Collecting Sensitive Data (Voice Only)
The Collect Info card includes a This card collects sensitive data toggle for voice flows that need to handle payment card numbers, Social Security Numbers, or other sensitive personal information in a PCI-compliant manner. When this toggle is enabled, the caller's input is automatically redacted from call recordings, transcripts, call logs, and all other system records.
Note: The sensitive data toggle is available for Capacity Voice (IVA) flows only. It is not supported in chat or other channel types. For more information on how sensitive data protection works and best practices for building compliant flows, see PCI Compliance & Sensitive Data Handling in Guided Conversations.
To enable sensitive data collection on a Collect Info card:
- Add a Collect Info card to your flow as usual.
- Enable the This card collects sensitive data toggle.
- Additional fields will appear. Select the Data Typefrom the dropdown:
- Credit Card Number - Built-in validation is applied automatically. No regex needed.
- Social Security Number - Built-in validation is applied automatically. No regex needed.
- Other - For other sensitive values. An optional Regex Validation field is displayed if you want to validate the format of the input.
- Review or customize the Retry Message. This message is returned to the caller if their input fails validation. The default text is: "I'm sorry but the provided information could not be validated. Please repeat with the correct format."
- Select an exchange in the On Validation Failure Route To field. If the caller's input fails validation after one retry, the flow will route to this exchange. This field is required.
- Click Save.
What happens when this toggle is on:
- The caller's spoken input is immediately redacted. Only a masked value (e.g.,
****-****-****-1111) is stored in the conversation variable, logs, and transcript. - The portion of the call recording during sensitive input is replaced with a 1kHz tone - the caller's actual sensitive data is never captured in the recording file.
- The original value is stored in an encrypted, short-lived secure store and can only be retrieved explicitly via a reference token - for example, to pass to a payment processing API via an App Action card.
- If validation fails on the first attempt, the Retry Message is returned and the caller is prompted to try again once. If validation fails again, the flow routes to the exchange selected in the On Validation Failure Route To field.
Important: Do not use AI Agent cards to collect or process sensitive data. AI Agent cards are not PCI compliant for this purpose and cannot be used in sensitive data flows. Sensitive data must always be collected using the Collect Info card with this toggle enabled.
Form
This card enables you to create a form document within the conversation.
To start, click the plus sign, and select Form in the drop-down menu, then you can customize:
- Form Name
- Form Description
In order to customize the form further, you can select the + sign in the middle of the form set up and add additional information.
Here you can add information specific to the form itself.
Dropdown
To create a card with a dropdown list of options, click the plus sign, and select Dropdown card in the drop-down menu, then:
- Type your question into the open text box to prompt the user.
- Name your variable in the Save selection as field.
- Add a choice to populate your dropdown options.
Within this card there are options to allow multiple selections, randomize order, include a "other" dropdown option and disable text input. Toggle any of these options that you wish.
Then hit save to save the card.
Rating Scale
To create a rating scale within the card, click the plus sign, and select Rating Scale in the drop-down menu, then you can customize how you'd like the information to appear.
- Type your question into the open text box to prompt the user.
- Name your variable in the Save Reply As field.
- Select whether you want the survey response to appear as Stars or Numbers.
- Select the Number of Steps on the rating scale (choose 2-10).
- Enter Left and Right Labels for your Scale, if desired.
- Decide if you want to enable or disable text input and click Save.
Date/Time
To add the date and time to a card, click the plus sign, and select Date/Time in the drop-down menu, then you can add your response.
By clicking into the response, you can further specify how you would like the date and time information to be collected. You can choose Date and Time or Date Only. Further, you can format the date in several ways, and disable dates that have already passed. When you've completed your formatting, select Save.
Simple Message
A Simple Message card allows you to send a message through the chatbot that does not require a response from the chat user. Simple Message cards are often used as the last card in the conversation to send a final response (although any card type can be used to end a conversation). Simple Message cards are also used to send one response right after another. This can help separate two thoughts and make the experience a bit more conversational.
Adding a Simple Message Card
- Click the plus sign, and select Simple Message card from the drop-down menu.
- Type the response in the open text box. Click Done.
Multiple Paths
The Multiple Paths card is used to route users with similar questions to the most relevant response based on additional user interaction.
For example, if a user asks about resetting a password, Capacity might respond "What system can I help you with?" and then provide the paths of "Personal Computer", "Salesforce", "Zenefits", "Email" or "Other." Depending on the user's selection, the conversation can pivot to the most relevant response.
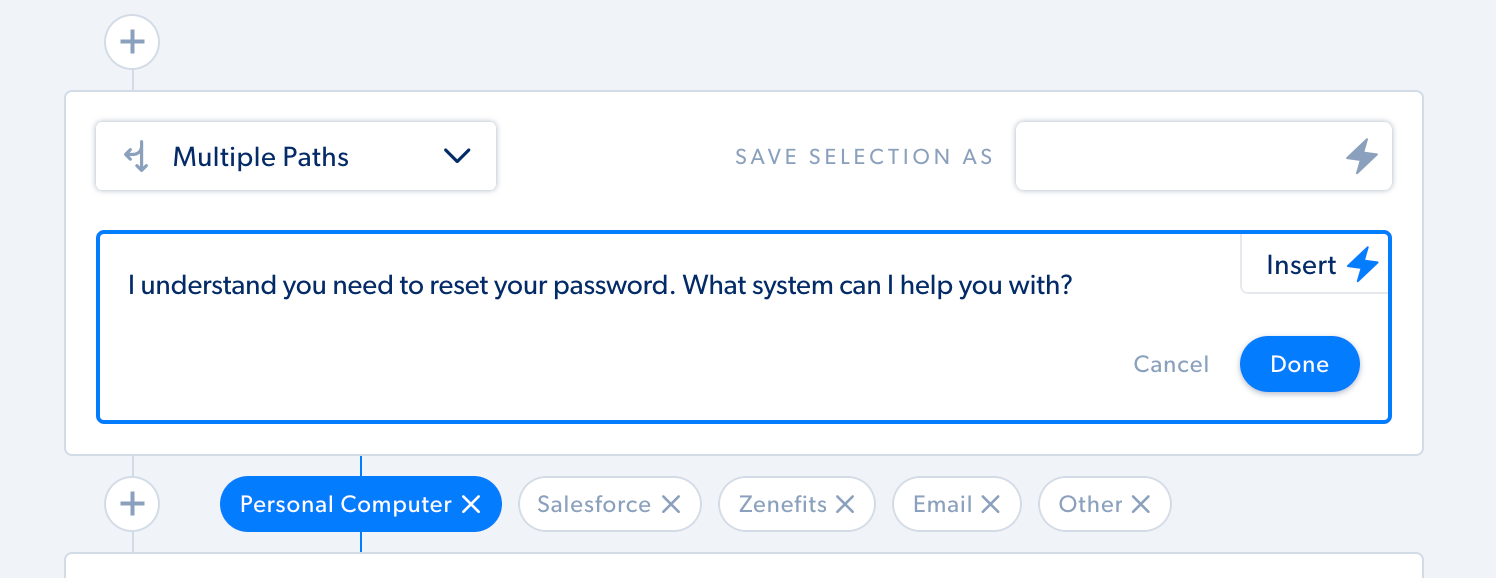
Adding a Multiple Path Card
- Click the plus sign, and select Multiple Paths card from the drop-down menu.
- Type your question or intro text in the open text box. Click Done.
- Rename your paths from the default values by clicking on each path bubble.
- To add more paths, click the plus sign to the right of your existing paths.
- Build out the rest of your guided conversation for each path you created. To work on a particular path, simply select that path bubble.
Examples: first_name, contact_method
Note: there is a limit of 8 multiple card paths. If more are needed, potential workarounds include: chaining together multiplte multipath cards, and have one of the options be "other" that leads to the second multipath card. Or using logic cards because they can have more than 8 paths.
Additional Resources
For help with Guided Conversations or any of the above topics, please get in touch with our support team at support@capacity.com.